WSPR transmitter / receiver
with convenient user interface
ADVANCED HIGHLY EXTENDED LINUX VERSION
(for ARM, PC-32bit and PC-64bit)
Features:
| WSPR Protocol developed by Joe Taylor K1JT (please visit his website: http://physics.princeton.edu/pulsar/k1jt/ ) | |
| WSPR Decoder (pure C language) originally written by K9AN, is now parts of K1JTs WSPR software | |
| GUI and other functions by DJ0ABR | |
| waterfall with many individual settings | |
| list of received stations | |
| direct access to WSPRNET.org, updates spots every two minutes | |
| database driven (SQlite) storage of the spots of two different stations | |
| presentation of the spots of two stations with direct comparison of the station performance | |
| graphical display on maps | |
| database includes ALL your WSPR spot from ever (since March 2008) | |
| direct control of the U02-DDS Synthesizers for WSPR transmission via USB, and alternatively: | |
| RX and TX operation with a usual transceiver via the sound card | |
| multitasking software uses multi core processors (for ARM boards a dual core ARM CPU is highly recommended like a Banana PI, don't even try it on a RaspberryPI) | |
| store data locally to save bandwidth of wsprnet.org |
Screenshots:
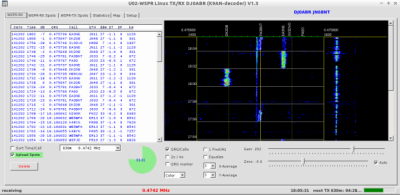
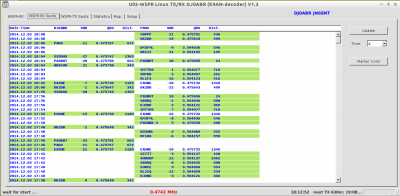
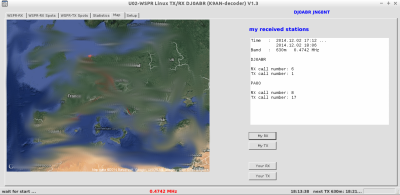
| WSPR Reception: | List for received or transmitted spots, Statistics: | Graphical presentation: |
 |
 |
 |
system requirements:
| computer running Linux. This may be a 32 or 64 bit PC or a small ARM board (dual core or better) | |
| CPU running at 1 GHz or higher | |
| min. 1GB RAM | |
| on ARM computer: use a fast SD (Class 10) or eMCC card | |
| reception via sound card (microphone or line-IN input) | |
| transmission via sound card (line-OUT or headphones output), or via U02-DDS synthesizer |
The program was tested on these platforms:
ARM: BananaPI and Ordoid running Lubuntu
PC: Ubuntu and Opensuse 32 bit and 64 bit
it should also run on any other Linux platform if it meets the system requirements and supports the required additional packages.
Credits:
This program is only possibly due to the excellent work of K9AN who wrote a WSPR decoder in C language. I am using the original code without any modification. The following ZIP files contain the precompiled binaries of the K9AN decoder .
Installation:
Four steps to the successful installation:
now we go through these four steps in details:
1. DOWNLOAD
ready compiled binary images V3.03-(SDR):
new in 3.02: This version includes an I/Q demodulator. You can connect it to conventional receivers as well as to SDR receivers.
64-bit PC Version:
for PCs with 64-bit Linux -> DOWNLOAD
ARM Version (for Singleboad Computer like Raspberry, Odroid...):
for boards with ARM processors (Odriod, Cubieboard, Raspberry PI2-Mod.B etc...). For Dual- or Quadcore CPUs (or better). (Does not run on slow single core boards like the old Raspberry etc.)
-> DOWNLOADARM 64-bit Version (for Odroid-C2):
ONLY for Odroid-C2:
-> DOWNLOAD
download one of the above packages. The installation is described later in chapter 4.
UPDATE 3.8:
THIS LINK contains the updated executable program version 3.5. Please install one of the above versions first, then download this update and replace the old visualwspr.exe file. Please see the description of this update at the end of this page.
Version 3.8: optimized to run on a Raspberry PI-2 Mod B with only 1GB of ram. I recommend Odroid C2 or XU4, but Raspberry PI-3 Mod B is almost that fast but has (unfortunately) only 1GB RAM.
Firmware U02 DDS:
if you use the U02-DDS Systhesizer as WSPR transmitter, then you should upgrade the firmware -> DOWNLOAD
2. Installation of system packages:
a few packages must be installed. Use the usual installation tools of your Linux distribution like apt-get or zypper/yast and install these packages:
libsndfile1 (if not found try: libsndfile)
libsndfile1-dev (if not found try: libsndfile-devel)
libfftw3-3 (if not found try: libfftw3)
libfftw3-dev (if not found try: fftw3-devel)
mono-complete
gcc
make
git
unzipthe exact names may vary between versions and linux distributions. If above packages are not found, then try these names:
libsndfile1, libsndfile1-dev, libfftw3-3, libfftw2-dev or use the search tool of your package manager to find the exact name of the package.
Raspberry PI 2 Model-B: additionally you need to install these packages:
libtool
gettext
autoconfExample:
On the banana-PI you will install libsndfile, on the Odroid the same package has the name libsndfile1. So if you don't find a package, search for it. These packages exists in all cases, but names may vary slightly.
Examples: Open a Linux console and enter:
Ubuntu/Debian:
sudo apt-get install libsndfile
etc ...or use the graphical package manager of your distribution.
Additionally the package SQlite must be installed. All Linux distributions. Since this is already installed by default in most Linux distributions, there is nothing to do.
3a. Installation of the latests "mono" version:
we need a mono version 3.12.0 or higher.
you can check the installed version with the command:
mono -V
Currently (Jan/Feb 2015) all defaukt mono versions are too old (i.e.
Raspberry delivers version 3.2 only), so you will
need to install the most actual version manually. This is a very simple process
but it will take some time (between one and abt. 4 hours depending on the
computer and the speed of your internet).
Open a console and enter these commands (every command may take long time to
complete. Continue with the next command ONLY if the previous command finished
without error !)
Go to your home directory (i.e. /home/bananapi, or whatever you use) and enter these commands:
git clone git://github.com/mono/mono.git
cd mono
git checkout mono-3.12.0-branch (or a later stable version)
./autogen.sh --prefix=/usr/local
make
sudo make installnow reboot your computer !
Possible problem (for non US/UK users only):
After executing make: if you get the error message "Input string
is not in the correct format", then you need to set your board to US or UK
english locales. I.e. with the raspberry this is done with the raspi-config
command. After make finishes without errors you can set the board back to
your local language.
Possible problem when running make:
If make stops with an error message saying "The compiler gmcs doesnt
appear to be usable", then run this command: make get-monolite-latest and
then try running make again.
3b. update the gdi libs:
These libraries paint on the screen. Most distributions delivery old versions which may cause the wspr program crashing. In this case update this library with these commands:
Preparation:
Ubuntu: sudo apt-get install libgtk2.0-dev libjpeg8-devel
Opensuse: install with YAST: glib2-del, cairo-devel, libjpeg8-devel
git clone git://github.com/mono/libgdiplus
cd libgdiplus
./autogen.sh --prefix=/usr/local
make
sudo make install
3c. Install HAMLIB:
HAMLIB is used to control transceivers via trhe CAT interface. Most distributions have ready packages available for download. In some cases the repository must be specified before installation.
Opensuse:
add this repository: download.opensuse.org/repositories/hamradio/openSUSE_13.2
(or your OpenSuse version).
Then install hamlib with YAST. Additionally install grig.
Ubuntu:
as I have seen the hamradio repository is already available, you can install
hamlib with apt-get:
apt-get install libhamlib-utils grig
Check if the installation was successful:
if this command display a list of supported transcweivers then hamlib was
successfully installed:
rigctl --list
Another nice tool is grig, which is a GUI for hamlib and allows you
to control your transceiver.
4. Installation of the WSPR software:
create a new directory below your home directory with any name of your choice (I will use the name: wsprcan-master).
Now copy the ZIP file into this folder.
Unzip the zip file, the unpacked file must also be in this folder.
Example:
cd /home/odroid/wsprcan-master
unzip wsprutil_xxx.zip (name depends on downloaded version)
Congratulations, we are done with the installation. The WSPR program is now ready to use.
Start it from a console with:
mono visualwspr.exe
You can also make a desktop icon shortcut to start this program. But starting it in the console has the advantage that you can watch diagnostic messages from the program.
5. Soundcard selection:
the program uses the default soundcard. This works fine if your computer has one soundcard installed.
There are some special cases where it cannot find the right sound card (i.e. if you have additional USB soundcards, access the program via the network, congestions due to pulseaudio etc.)
I solved these issues successfully by checking the file /etc/asound.conf (in other Linux distributions than ubuntu this file may reside in an different folder). If the file does not exist and you have problems accessing the sound card, then you can create this file and enter this contents:
pcm.!default {
type hw
card 0
device 0
}
ctl.!default {
type hw
card 0
}
card 0 ... this is usually the first soundcard in your computer, the soundcard integrated on the main board.
If you connect an additional sound card (i.e. an USB soundcard) it will be card 1.
To show the sound cards available in your computer enter :
aplay -l (the -l is a dash and a lima)
If the card 1 should be used, then change the above file. Modify the entries card 0 with card 1, the reboot.
Raspberry PI2-Mod.B:
this board runs with Raspbian which is a bit different to Ubuntu. DG6RCH found out how to use an external USB soundcard which is required to have the Lini-IN input. These changes to system files are required:
File: /etc/modprobe.d/alsa-base.conf
look for the line : options snd- usb-audio index=-2 and make this change: index=0
File: /etc/modules
add this line: snd-usb-audio
place a leading # sign in front of this line: snd-bcm2835 to deactivate the internal sound chip.
now reboot.
Sound Recording Options (available with software version 2.0 or higher):
this program uses the Linux tool arecord to capture sound from the sound card.
The command line options used are: -d 112 -f S16_LE -r 12000 -t wavSometimes it may be required to add additional options, i.e. to select another soundcard or channel.
You can add additional options in the setup window. Your additional options will be added to the above command line options.
(I am using this additional option: -Dplug:default . This helps finding the soundcard if I run wspr on an odroid computer and controlling it via network from a remote PC).
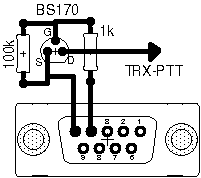
6a. PTT for the external transceiver
(users with a U02-DDS do not need this chapter).
The PTT of your transceiver is controlled via a USB-serial adapter which can be purchased for little money in every PC shop.
The PTT control lines are on pin4 (and pin 7) of the 9pin Sub-D connector.
Three components (two resistors and one Mosfet Transistor) are used to convert the output level of the connector into the signal used by your transceiver. Build this circuit, the three components fit into the case of the connector easily. This circuit is similar to most PTT control circuits for other programs. So if you are alrady running i.e. PSK31 then you may already have this circuit in use.
Pin 5 is the ground, which must also be connected to your transceiver.
In the setup menu of visualwspr.exe select "external TRX".
(Please remember that many transceivers have a menu setting which enables the PTT control via the packet-radio or data interface)
! your user account must have the permission to access the USB-serial converter (tty device) !
ARM-Lubuntu: this is ok by default, nothing do do.
Ubuntu and Opensuse: the normal user does NOT have access to the serial ports (user group: dialout). You can start the program as administrator (root) or you add the permissions to your user account with the command sudo gpasswd --add username dialout (where username is the name of your account). Then reboot to make this change effective.
6b. PTT Control and automatic frequency setting via HAMLIB:
Beginning with version 2.1 wsprlinux supports remote control of your transceiver via HAMLIB. hamlib must be installed and tested as described above.
You must adapt the rigctl command line to your transceiver. Go to the Setup window and choose PTT-Mode: rigctl(hamlib). The line RIG Control Script looks like that by default:
rigctl -m 114 -r /dev/ttyUSB1 -s 4800
Now change these settings:
-m 114 ... replace the 114 with the number of your transceiver. You can display a list of supported transceivers with the console command rigctl -l . See also a list (as of 2014) in appendix A at the end of this page.
-f /dev/ttyUSB1 ... this is the name of the USB/serial adapter where your transceiver is conencted. In Linux all USB/serial adapters have the names /dev/ttyUSB0, /dev/ttyUSB1, /dev/ttyUSB2 ... etc. You can show the actual name with the console command: ls /dev/tty* . If more than one adapters are connected then you need to find out the name by connecting/disconnecting the adapters and listing the names. However I recommend using only one USB/serial adapterto avoid confusion. Please remember that your user account must be member of the dialout group. This can be checked with the console command: groups. This command must show "dialout", if not then use the user management of your distribution to add the dialout group to your account.
-s 4800 ... this is the baud rate of your transceiver. Look into the menu of your transceiver to get the correct baud rate. Higher baud rates are recommended.
Additional options:
An CIV address is required for ICOM transceivers. Look for the CIV address is
the menu of your transceiver and then enter it as additional option.
Example: the transceiver has the CIV number 127. Add this option to the rigctl
line: -c 127 (don't forget the white spaces between all
entries)
automatically added options:
these command line option are added automatically by wsprlinux, there is nothing to do for you:
F 7038600 ... the freuquency. This is used to switch your transceiver to a new frequency.
T 0 or T 1 ... used to control the transceivers PTT, if PTT mode = rigtcl(hamlib)
7. some further tweaking
all temporary data are store in /home/userxyz/wsprcan-master/wav
If you use an SD card instead of a hard disk you may want to define this
folder as ram disk. This extends life time of the SD card.
It can be done by adding this line into /etc/fstab (tested with Lubuntu):
tmpfs /home/userxyz/wsprcan-master/wav tmpfs nodev,nosuid,size=25M,mode=1777 0 0
and then reboot.
8. First program start
When started first the program will show the setup window. Please enter your callsign and QTH locator, switch the transmitter to i.e. external TRX. Now you can test if the PTT works by pressing the button "PTT manual ON/OFF".
Enter also the WSPR parameters, Power, TX Interval and offset.
Then go to the tab "WSPR Spots" and enter your callsign as Call-1, and enter any other callsign (your friend's call) into Call-2. This allows you to compare your spots with the spots of another station.
"WSPR-RX" is the main receiver window. After the program starts it will wait for the beginning of a WSPR period (an even minunte) and the status line shows "wait for start".
As soon as the reception is started, the waterfall will display the received spectrum. In the lower right corner you see a level bar. Adjust the level of your sound card input to get a green or yellow bar.
! When the program is started for the first time it will build the WSPR database and fill it with all your spots from 2008 up to now. This may take a long time. See in the top of the window: "Database from ...". During this time the system is very busy, its a good idea to wait until the database is fully loaded before starting with normal operation ! You can watch the progress in the console. This process is finished when the spots from 3.2008 are processed.
All these downloads and database processing is done in the background, so you can immediately start using wsprlinux to receive and send WSPR spots.
Now be ready to explore all the other features of the program by yourself,
see you in WSPR,
DJ0ABR
Kurt
![]()
Update 3.6:
this version supports the well known MYSQL database, locally as well as in network mode. The usual embedded sqlite database from the previous versions is also supported.
The database can be selected in the "setup" windows. Click on "Database Setup" and make your choice. If the database settings and modified then the software must be closed and restarted !
Which database should be used:
"normal users": you can use the sqlite database. This database works out of the box and needs no special settings.
"advanced users": if you install a mysql-server on your computer or any computer in your home network then you can use mysql. This has some advantages: it is faster, it can run in the network and support multiple instances of visualwspr. I.e. you have two computers running visualwspr. Both can be connected to the same database.
Both databases are automatically filled with all your spots ever made (beginning 2008 when WSPR started). It will be filled automatically in the background. This may take several hours. During that time you can fully use visualwspr for WSPR RX and TX.
To get access to a Mysql Server we need to install a "connector". Go to this webite:
https://dev.mysql.com/downloads/connector/net/6.9.html
and download the latest version. Choose .NET&mono as platform and download the ZIP file.
The unzip this file, go to the subfolder v4.5 and enter in a console:
sudo gacutil -i MySql.Data.dll
Now visualwspr can access a mysql server, locally or in the network.
60m Band extension:
Two frequencies are currently used on the 60m band. Go to the Setup-window and select your preferred QRG (selectable for RX and TX separately). You can select both to automatically use these QRGs alternating.